
前言
一个美观易用的博客系统至关重要,而ghost博客正具有该优点。然而ghost博客比其他php博客安装起来更麻烦,同时也更容易出现错误。宝塔面板作为一个服务器控制面板,给诸如笔者的新手小白在管理维护网站上提供了极大的便利。因此笔者撰写本文详细讲述如何在宝塔面板上安装ghost博客系统。
服务器配置建议
笔者使用的服务器配置是2C4G,宽带7M,系统盘100G。由于ghost博客系统要求MySQL数据库版本至少为MySQL8.0,因此笔者建议服务器的最低配置为2C2G3M+40G磁盘。
下面开始介绍安装过程。
安装过程
安装宝塔面板
根据宝塔面板官网的教程来安装,宝塔面板的安装及使用这里不再赘述。
安装和配置初始环境
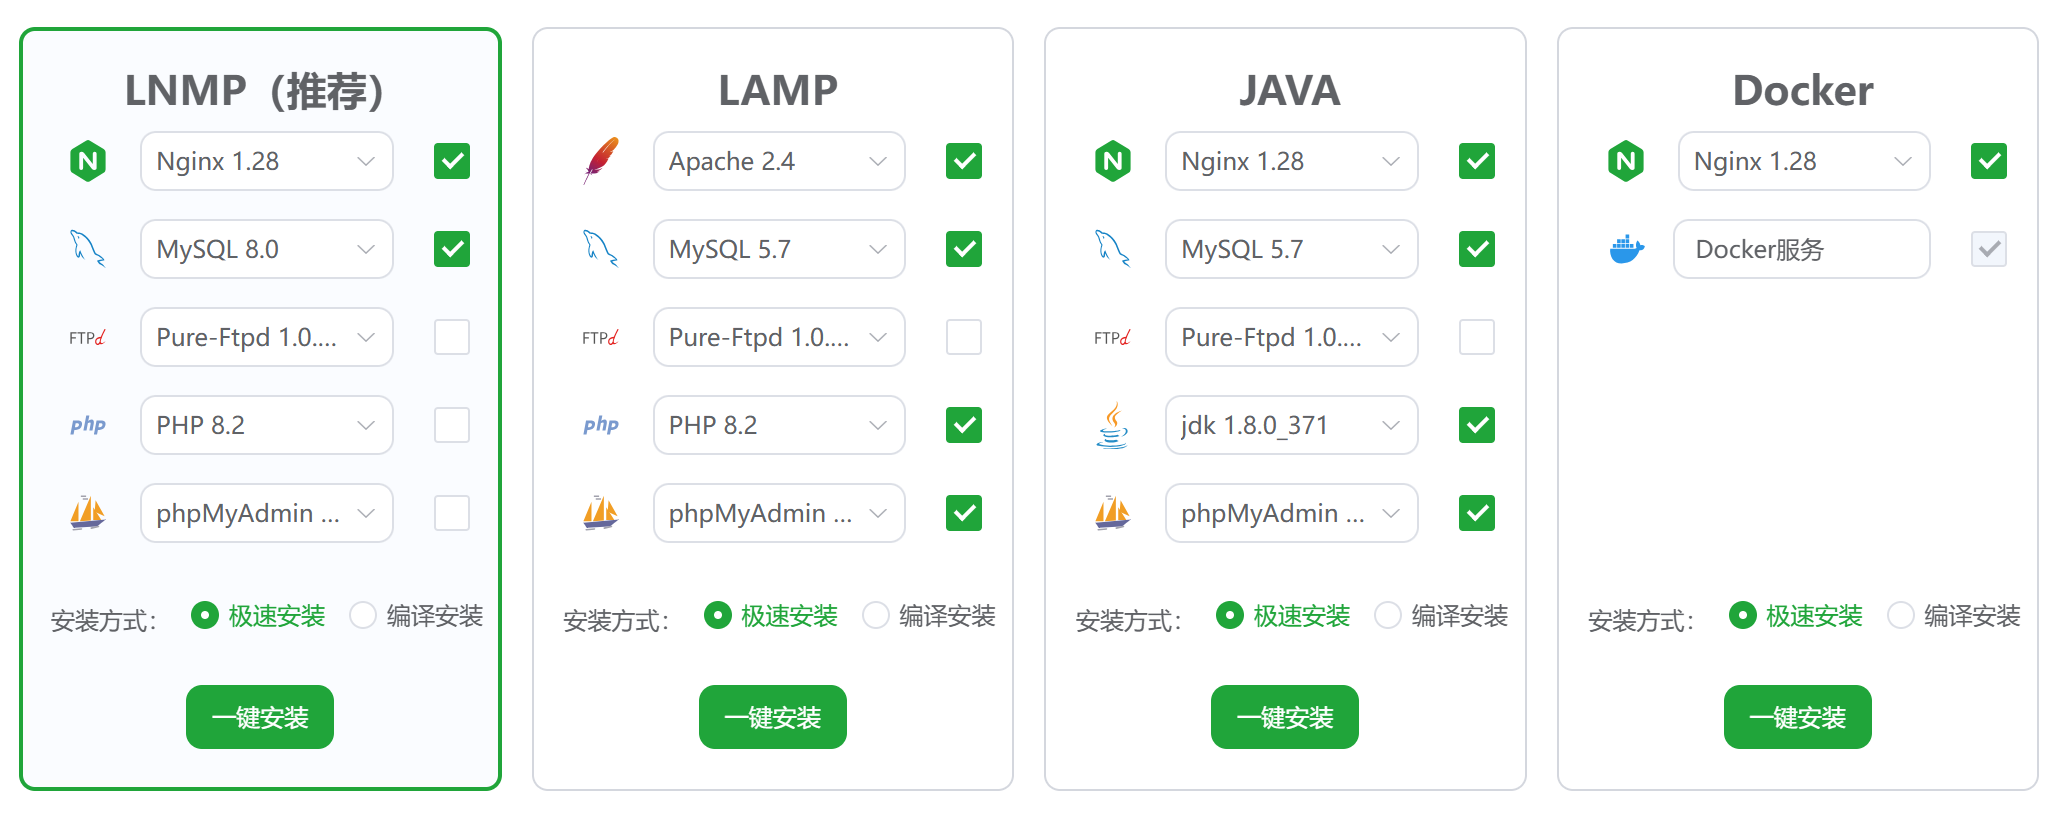
登录宝塔面板后在宝塔面板的“初始化推荐配置”弹窗中,选择安装Nginx和MySQL即可,注意选择MySQL8.0的版本,如下图所示。
等待安装后,在左侧栏中点击“数据库”,并创建一个数据库。这里我以ghost作为数据库的用户名。
安装Node.js
由于ghost不能在root用户下安装,因此要先切换至ubuntu用户:
sudo su ubuntu
使用以下命令安装Node.js:
sudo apt-get update
sudo apt-get install -y ca-certificates curl gnupg
sudo mkdir -p /etc/apt/keyrings
curl -fsSL https://deb.nodesource.com/gpgkey/nodesource-repo.gpg.key | sudo gpg --dearmor -o /etc/apt/keyrings/nodesource.gpg

NODE_MAJOR=22
echo "deb [signed-by=/etc/apt/keyrings/nodesource.gpg] https://deb.nodesource.com/node_$NODE_MAJOR.x nodistro main" | sudo tee /etc/apt/sources.list.d/nodesource.list

sudo apt-get update
sudo apt-get install nodejs -y
注意,笔者在写此文章之时,ghost支持的Node.js版本为22。如果版本有变,将NODE_MAJOR=22中的22改为对应数值即可。
安装完成后,输入命令node -v如果返回值为v22.21.0(或其他支持的版本)即为安装成功。
安装Ghost-CLI
Ghost-CLI即ghost命令,是接下来安装、维护博客系统的基础。
sudo npm install ghost-cli@latest -g安装时间可能较长,笔者等了4分钟才安装好。出现warn警告不用管。
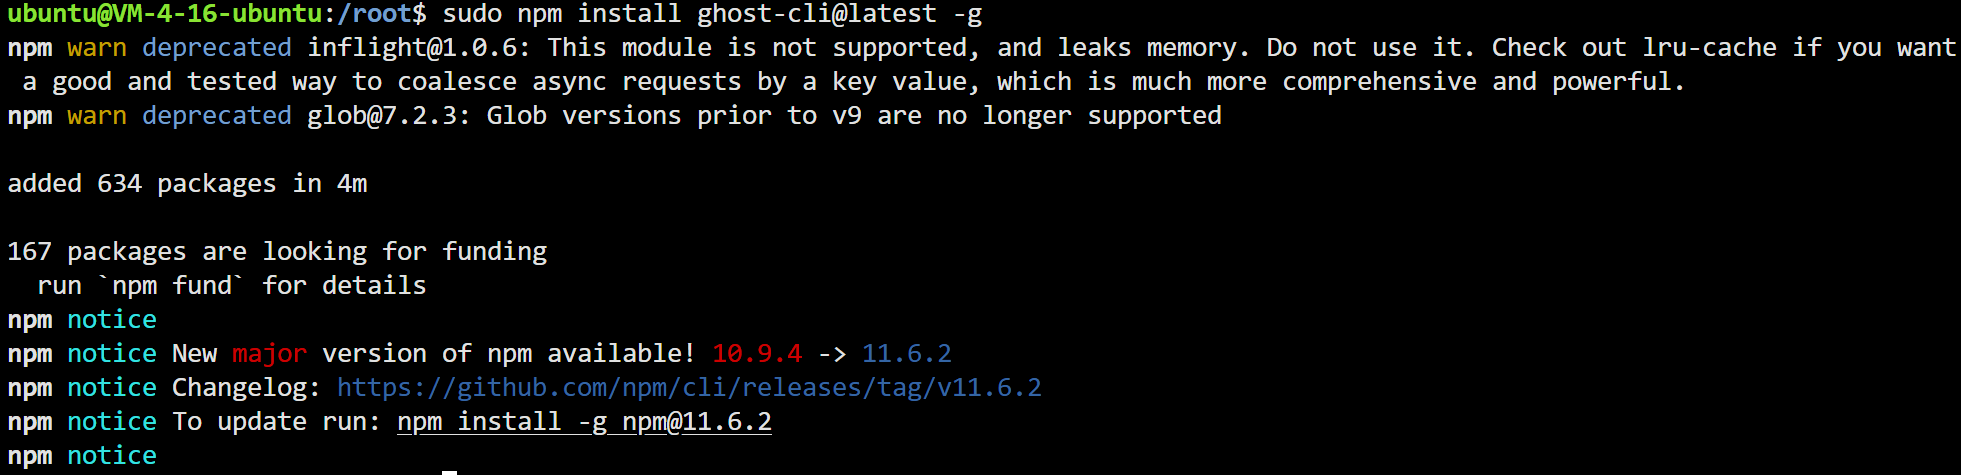
如果出现err字样,说明安装失败,重新执行命令安装即可。
安装ghost
首先创建要安装ghost博客的路径:
sudo mkdir -p /www/wwwroot/Ghost
sudo chown ubuntu /www/wwwroot/Ghost
sudo chmod 775 /www/wwwroot/Ghost
cd /www/wwwroot/Ghost这里的/www/wwwroot/Ghost为安装路径,读者可以根据自己的安装路径进行更改。然后,进行ghost的安装。
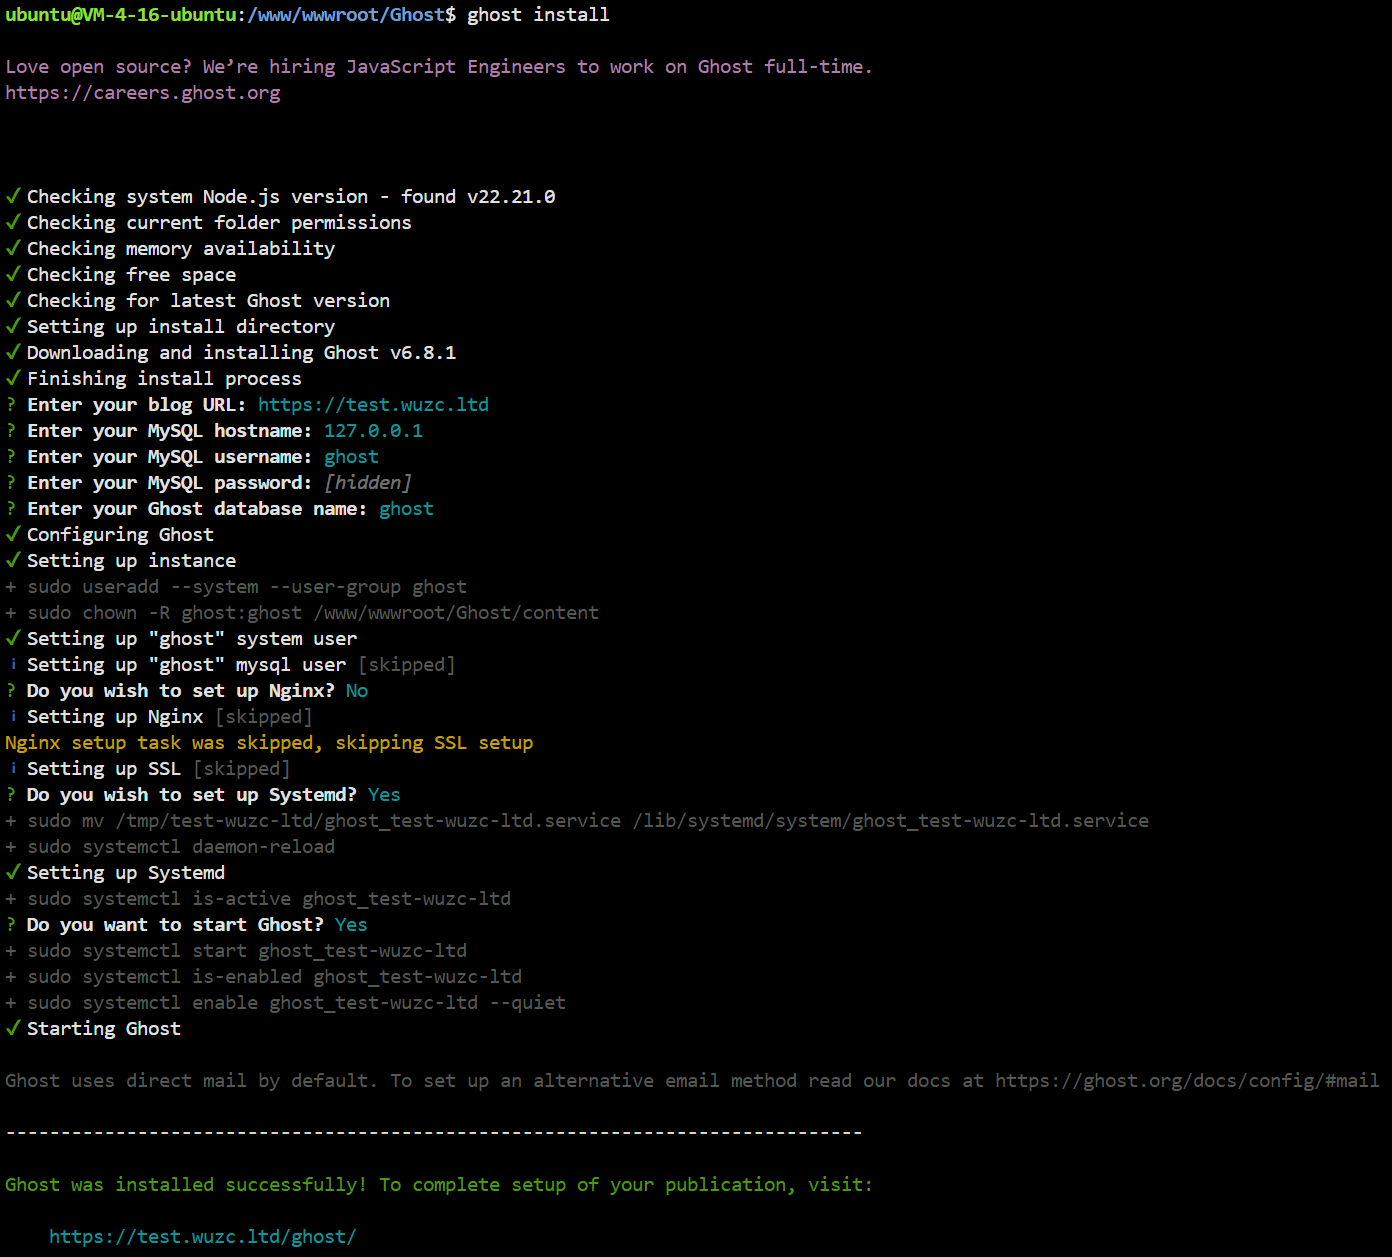
ghost install安装需要5分钟左右,如果网络出现波动时会更长。
安装完成后,系统会询问下表中的问题以完成网站的设置:
| 问题 | 解释 |
|---|---|
| Enter your blog URL | 网站的URL |
| Enter your MySQL hostname | 默认127.0.0.1,因此直接回车即可 |
| Enter your MySQL username | MySQL用户名 |
| Enter your MySQL password | MySQL密码 |
| Enter your Ghost database name | 数据库名 |
| Do you wish to set up Nginx? | No |
| Do you wish to set up Systemd? | 是否需要守护进程,这里我选择Yes |
| Do you want to start Ghost? | 是否需要立即启动Ghost |
在宝塔面板中设置网站
首先在宝塔面板中新建网站,域名就是刚才填写的网站URL。php版本设置为纯静态。
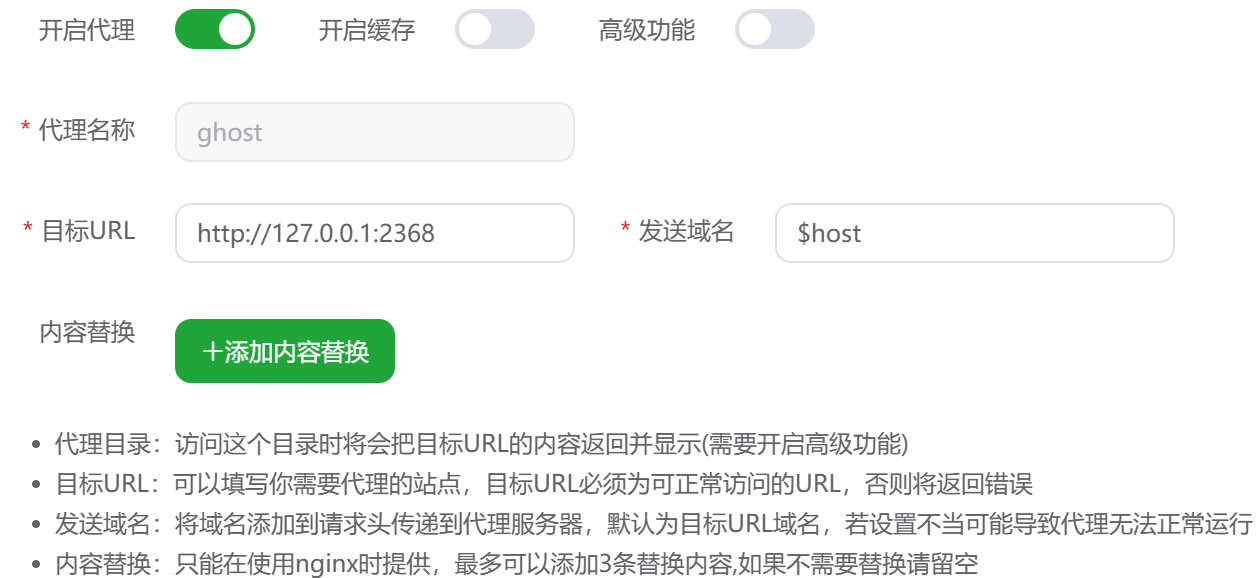
打开网站设置,先部署网站SSL,接着设置反向代理,具体参数如下图所示。
点击确定,然后点击“配置文件”进行编辑,并将里面的所有内容替换为以下内容:
#PROXY-START/
location / {
      proxy_set_header Host $http_host;
      proxy_set_header X-Real-IP $remote_addr;
      proxy_set_header X-Forwarded-For $proxy_add_x_forwarded_for;
      proxy_set_header X-Forwarded-Proto $scheme;
      proxy_pass http://127.0.0.1:2368;
    }
#PROXY-END/
然后打开 Ghost安装目录/versions/6.8.1/core/shared/config/defaults.json (这里的6.8.1为版本号),将第二行的http://localhost:2368替换成https://网站URL,然后打开终端,重启ghost:
sudo su ubuntu
cd ~
cd /yourpath/  #填写自己安装ghost的路径
ghost restart
至此,ghost博客系统已经成功安装。至于后台的一些功能,感兴趣的读者可以自行探索,这里不再详细讲述。下面介绍一些优化操作。
Ghost博客系统的优化
字体设置
打开Code Injection将以下代码注入Site Header中:
<link href="https://fonts.googleapis.com/css?family=Noto+Serif+SC" rel="stylesheet">
<style>
    .post-content,.post-card-excerpt{font-family: 'Noto Serif SC', "PingFang SC","Helvetica Neue",Helvetica,"Hiragino Sans GB","Microsoft YaHei","微软雅黑",Arial,sans-serif;}
    .post-full-content{font-size: 105%;}
    .post-full-custom-excerpt {font-size: 1.8rem;}
    .post-full-title {font-size:3.2rem;}
    .post-full-content blockquote{margin:20px;padding: 1em;  background-color: #3eb0ef14; }
    .post-full-content blockquote p {font-style:normal;}
    .post-full-image {display:none;}
    p {margin: 0 0 0.7em !important;}
</style>
<script async src="https://pagead2.googlesyndication.com/pagead/js/adsbygoogle.js?client=ca-pub-3033682102630105"
     crossorigin="anonymous"></script>
<script src='https://cdnjs.cloudflare.com/ajax/libs/mathjax/2.7.2/MathJax.js?config=TeX-MML-AM_CHTML'></script>
代码高亮
这里我们使用highlight.js实现代码高亮。
打开对应的主题目录,在其中找到default.hbs,进入编辑界面,在<head>标签内引入highlight.js样式:
<link href="//cdn.bootcss.com/highlight.js/9.0.0/styles/tomorrow.min.css" rel="stylesheet">然后在<body>标签内添加以下代码:
<script src="//cdn.bootcss.com/highlight.js/9.0.0/highlight.min.js"></script>
<script >hljs.initHighlightingOnLoad();</script>
保存后重启ghost。
设置评论系统
Ghost没有自带的评论系统,因此我们需要引入外部的评论系统,这里我们选择Gitalk作为评论系统。
打开主题目录,找到post.hbs,找到<article>,并在其最后添加以下内容:
<div id="gitalk-container"></div>
<link rel="stylesheet" href="https://registry.npmmirror.com/gitalk/1.6.2/files/dist/gitalk.css">
<script src="https://registry.npmmirror.com/gitalk/1.6.2/files/dist/gitalk.min.js"></script>
<script>
  const gitalk = new Gitalk({
    clientID: 'GitHub Application Client ID',
    clientSecret: 'GitHub Application Client Secret',
    repo: 'GitHub repo',      // The repository of store comments,
    owner: 'GitHub repo owner',
    admin: ['GitHub repo owner and collaborators, only these guys can initialize github issues'],
    id: location.pathname,      // Ensure uniqueness and length less than 50
    distractionFreeMode: false  // Facebook-like distraction free mode
  })
  gitalk.render('gitalk-container')
</script>各参数可以参考Gitalk的Github来填写,这里不再介绍。
类似的评论系统还有Valine等,感兴趣的读者可以自行探索。
在新的选项卡窗口打开外部链接
默认情况下,Ghost 博客的帖子中的所有链接都会在同一浏览器窗口中打开,也就是会覆盖当前页面。然而这会导致返回原来的窗口更加麻烦,从而降低用户的体验感。
为了解决这个问题,我们可以打开Code Injection,并在Site Footer中注入以下代码:
<script>
  const domain = location.host.replace('www.', '');
  const links = document.querySelectorAll('a');

  links.forEach((link) => {
    if (!link.href.includes(domain) || link.href.includes(`ref=${domain}`)) {
      link.setAttribute('target', '_blank');
      link.setAttribute('rel', 'noreferrer noopener');
    }
  });
</script>
这样的话点击外部链接时,系统就会自动跳转到新的窗口中打开。
备份与迁移
在维护的过程中,经常需要进行数据的备份以及网站的迁移等操作,下面笔者将介绍如何备份以及迁移网站的数据。
备份
1.数据备份
进入后台,点击设置-Advanced-Import/Export,点击Export,选择Content&Settings,此时会下载一个json文件,此文件即为网站数据的备份。
2.图片备份
网站的图片位于/Ghost安装目录/content/images中,打包下载即可。
3.主题备份
进入后台,点击设置-Site-Theme,根据指引下载正在使用的主题。
迁移
在新的系统中,数据和主题可以根据指引上传还原。对于图片,可以先将其上传至images文件夹中,然后设置权限。
sudo su root
chown /yourpath/content/images ghost -R  #yourpath为Ghost安装位置